
DIY RESOURCES
Complete DIY Kitchen Renovation Resources & Expert Guidance
Welcome to Your DIY Kitchen Journey
Transform your kitchen with confidence using our comprehensive collection of DIY resources. Whether you're installing SOLLiD Cabinetry, updating countertops, or planning a complete renovation, our expert-created guides provide the knowledge and support you need for professional-quality results.
Our comprehensive guides cover all the essential information needed to help you plan your dream kitchen remodel.
From Key Layout Types, Space Planning, and Budgeting to Installation Guides, you can rest easy knowing you have references to use throughout your kitchen renovation.

BUDGET WORKSHEET
Plan your costs and your schedule with our editable Excel worksheet for smart spending and time management.
DESIGN LAYOUTS GUIDE
Explore key layout types and tips for planning an efficient kitchen that fits your space and lifestyle.

MEASURING GUIDE
Use this step-by-step guide to capture accurate room measurements before design begins.

pROJECT PLANNING GUIDE
Understand the full scope of your remodel with a clear breakdown of phases, timing, and tips.
DIY INSTALLATION GUIDE
Get practical tips and tool lists to help you install cabinets like a pro.
CONTRACTOR VETTING GUIDE
Hiring Help? Use this guide to screen contractors, ask the right questions, and protect your investments.
DIY Resource guides are designed for Homeowners installing kitchen cabinets and remodeling themselves. Files will be emailed to you as PDF Files or Excel Files. If you are having trouble please check your pop up blocker.
DIY Doesn’t Mean Do It Alone.
At DIY Custom Kitchen, we believe your remodel should reflect your vision—not someone else’s markup. That’s why we empower homeowners to take control of their kitchen transformations with professional design support, high-quality cabinetry, and tools built for success.
You dream it, we help you build it. From personalized 2D layouts and 3D renderings to order-ready materials and step-by-step guidance, we’re here to ensure your project runs smoothly. No sales pressure. No middlemen. Just your masterpiece—delivered your way.
Whether you're a confident DIYer or a contractor looking for pro-grade resources, our team helps you create a space you’ll love for years to come.
Who is this perfect for?

DIY Homeowners
If you're ready to take on your own kitchen remodel but want expert guidance, detailed plans, and high-quality cabinetry - we've got you covered.

Contractors & Builders
We streamline the design and ordering process for professionals, so you can focus on the project and deliver better results, faster.
Design Enthusiasts
If you love designing and helping homeowners and need 3d renderings, material specs, organized BOMs-we make it easy.

Who We Are
We’re not just designers—we’re remodelers, too
DIY Custom Kitchen was created by the team behind Alpha Remodelers to bridge the gap between full-service remodeling and the confidence of doing it yourself. With over 20 years of experience in remodeling design and construction operations, we’ve helped hundreds of homeowners bring their kitchens and bathrooms to life—from the first sketch to the final install.
As licensed remodelers and veterans, we bring discipline, detail, and care to every project. DIY Custom Kitchen combines expert planning, modern design, and premium products from Sollid Cabinetry so that homeowners and contractors alike can confidently remodel kitchens with professional results—without the inflated costs of traditional remodeling firms.
Whether you’re a weekend warrior, a contractor seeking reliable designs, or someone who simply wants control over their home improvement journey, we’re here to help you design, plan, and execute with clarity and support every step of the way.
What our Customers are Saying

Incredible Experience from Start to Finish!
The team at DIY Custom Kitchen made our dream kitchen a reality. From the 3D renderings to final delivery, everything was smooth and professional. We loved having full control over the design with expert guidance!
Cody Fisher
Contractor-Approved Support!
As a contractor, I’ve worked with many design companies, but this is one of the best. Their drawings and order processing made our installation quick and clean. Clients love the results!
Jason Lowe
Perfect for My DIY Remodel
I was nervous to take on a kitchen remodel myself, but the tools, design services, and support made it manageable—and fun! The budget spreadsheet and cabinet quality were game changers.
Albert Flores
Free Resources for your DIY Custom Kitchen
DIY Cabinet Installation Guide
Embarking on a kitchen renovation project can be both exhilarating and daunting. For the ambitious homeowner ready to take on a significant aspect of this transformation themselves, our DIY Cabinet Installation Guide is an indispensable resource. This clear, step-by-step guide is meticulously crafted to assist you through the entire process of installing kitchen cabinets. Whether you're a seasoned DIY enthusiast or a novice eager to learn, our comprehensive instructions will ensure your project is executed with precision and confidence. Get ready to enhance the heart of your home with skill and ease.
🔧 Tools You’ll Need:
Tape measure
Level (4-foot or larger recommended)
Stud finder
Pencil & chalk line
Cordless drill & impact driver
Clamps
Shims
Cabinet Screws (#10 x 2½" recommended)
Screwdriver set
Utility knife
Cabinet jack or ledger board (for uppers)
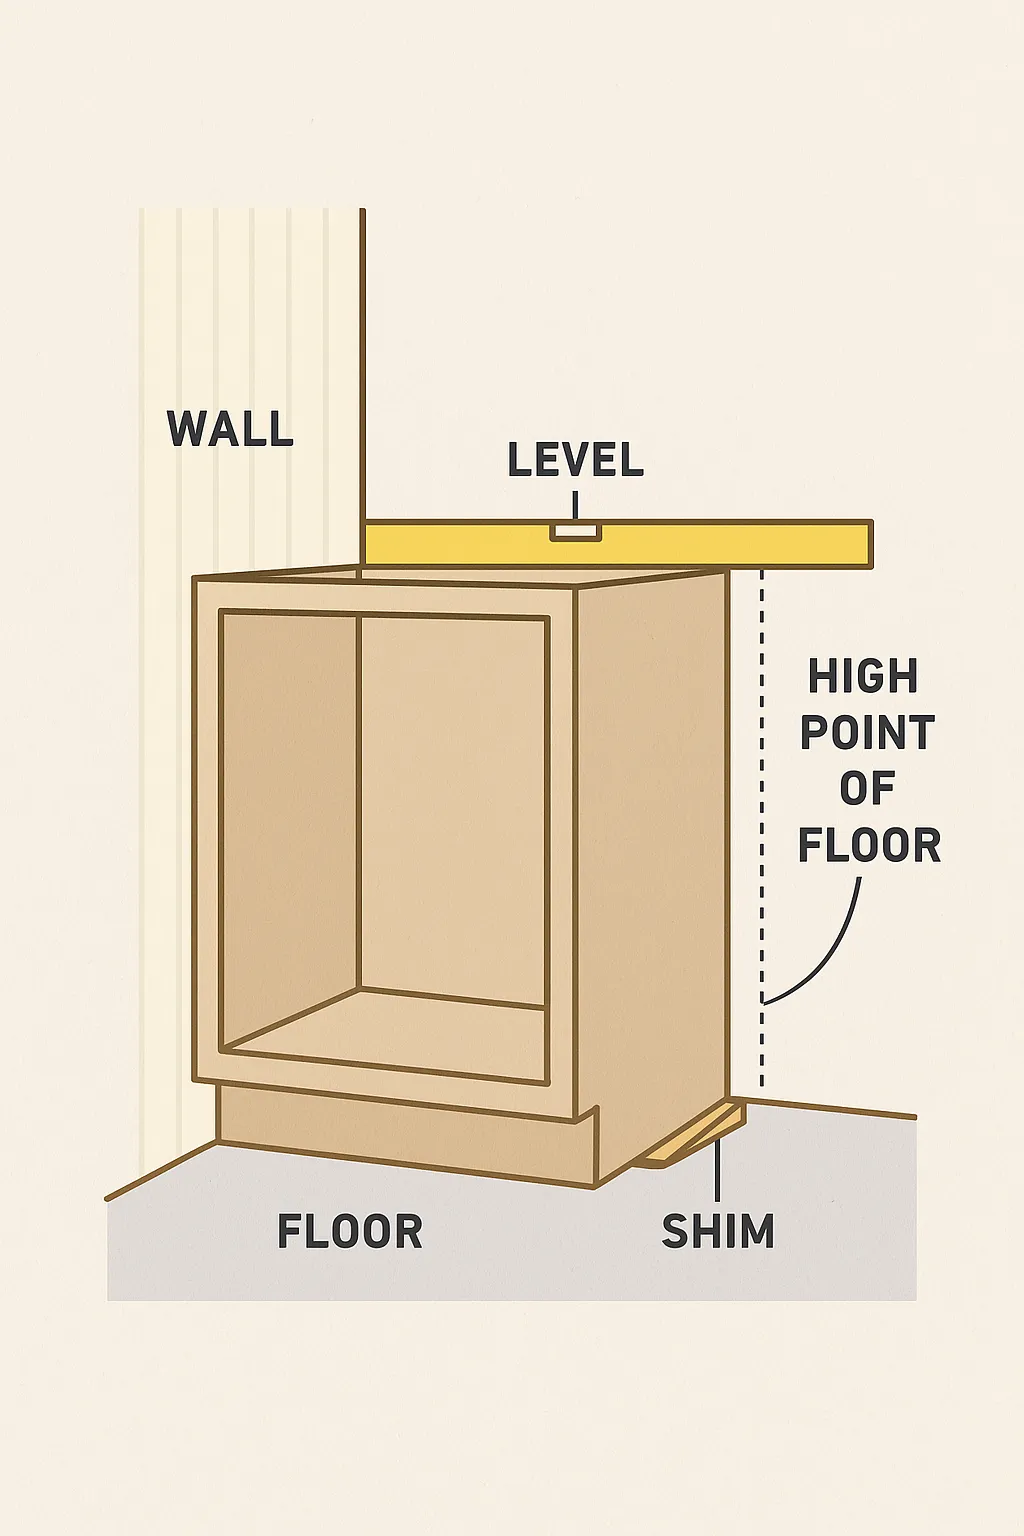
📐 Step 1: Prep and Layout
Mark cabinet layout on the wall – Use a pencil to mark the base cabinet and wall cabinet heights.
Locate and mark studs – Use a stud finder and mark all studs where cabinets will mount.
Check floor level – Use a level to find the highest point of the floor. Base cabinets should be aligned from this point.
Snap chalk lines – Mark lines for top of base cabinets and bottom/top of wall cabinets.
🔩 Step 2: Install Upper Cabinets First
Secure a ledger board or use a cabinet jack to support wall cabinets during install.
Start in a corner and work outward.
Lift the cabinet into place, align with stud marks, and screw into studs through the back panel.
Check level and plumb after each cabinet. Use shims as needed.
Clamp and screw cabinets together through the face frames (pre-drill holes first).
🧱 Step 3: Install Base Cabinets
Place first cabinet at the highest floor point. Shim as needed to level.
Screw into wall studs and connect adjacent cabinets through the face frames.
Recheck level every 2–3 cabinets.
Install filler pieces, panels, and toe kicks after main boxes are secured.
🧰 Step 4: Final Adjustments
Adjust hinges and drawer glides for smooth function.
Install toe kicks, end panels, and trim.
Add countertops after all cabinets are secured and leveled.
✅ Pro Tips:
Use cabinet installation screws—not drywall screws.
Always pre-drill face frame holes to prevent splitting.
A helper makes wall cabinet install much easier—don’t DIY that part solo.

Common DIY Custom Kitchen Questions
How long does the design process take?
Initial consultations provide immediate feedback and preliminary designs. Complete design packages typically require 2-7 business days for detailed plans and finalized 3D visualizations. SOLLiD cabinet orders generally have 4-6 week lead times from our Gilbert facility.
Can beginners successfully install kitchen cabinets?
Yes! With proper planning, quality tools, and our comprehensive support system, motivated homeowners regularly achieve professional-quality results. We recommend starting with our Design Package to ensure proper planning and preparation.
What if I encounter problems during installation?
Our support doesn't end when you purchase cabinets. We offer optional additional phone consultation, video support, and on-site assistance to resolve any challenges. Our goal is your success, and we're committed to helping you achieve it.
What makes SOLLiD Cabinetry special?
SOLLiD combines semi-custom flexibility with local Arizona manufacturing, offering thousands of design options with shorter lead times and superior quality control. Their DIY-friendly design and our comprehensive support make them ideal for homeowner installation.
Do you provide installation services?
We specialize in empowering DIY installation with expert guidance and support. However, for clients preferring professional installation, yes we are certified installers.
Your Kitchen. Your Vision. Your Build.
You dream it, we help you build it—no middlemen, just your masterpiece.
Explore Site
Useful Links
Contact Us
Copyright 2025. All Right are Reserved. DIYCustomKitchen.com is owned and operated by Tango Alpha Construction LLC.